Tokenless Data Notarization
This tutorial shows how you can prove that a block was part of the Tangle, even if it was already pruned from network nodes.
User Story
A prover wants to prove to a verifier that a dataset or file was not altered by notarizing it using the public and permissionless Tangle.
A good example could be the government (verifier) obligating companies (prover) to write their daily CO₂ emissions to the Tangle to create immutable logs. The government has no interest in providing storage for all the companies but wants to receive verifiable, immutable data in the case of an audit. Therefore, all the data remains with the respective company until an audit occurs.
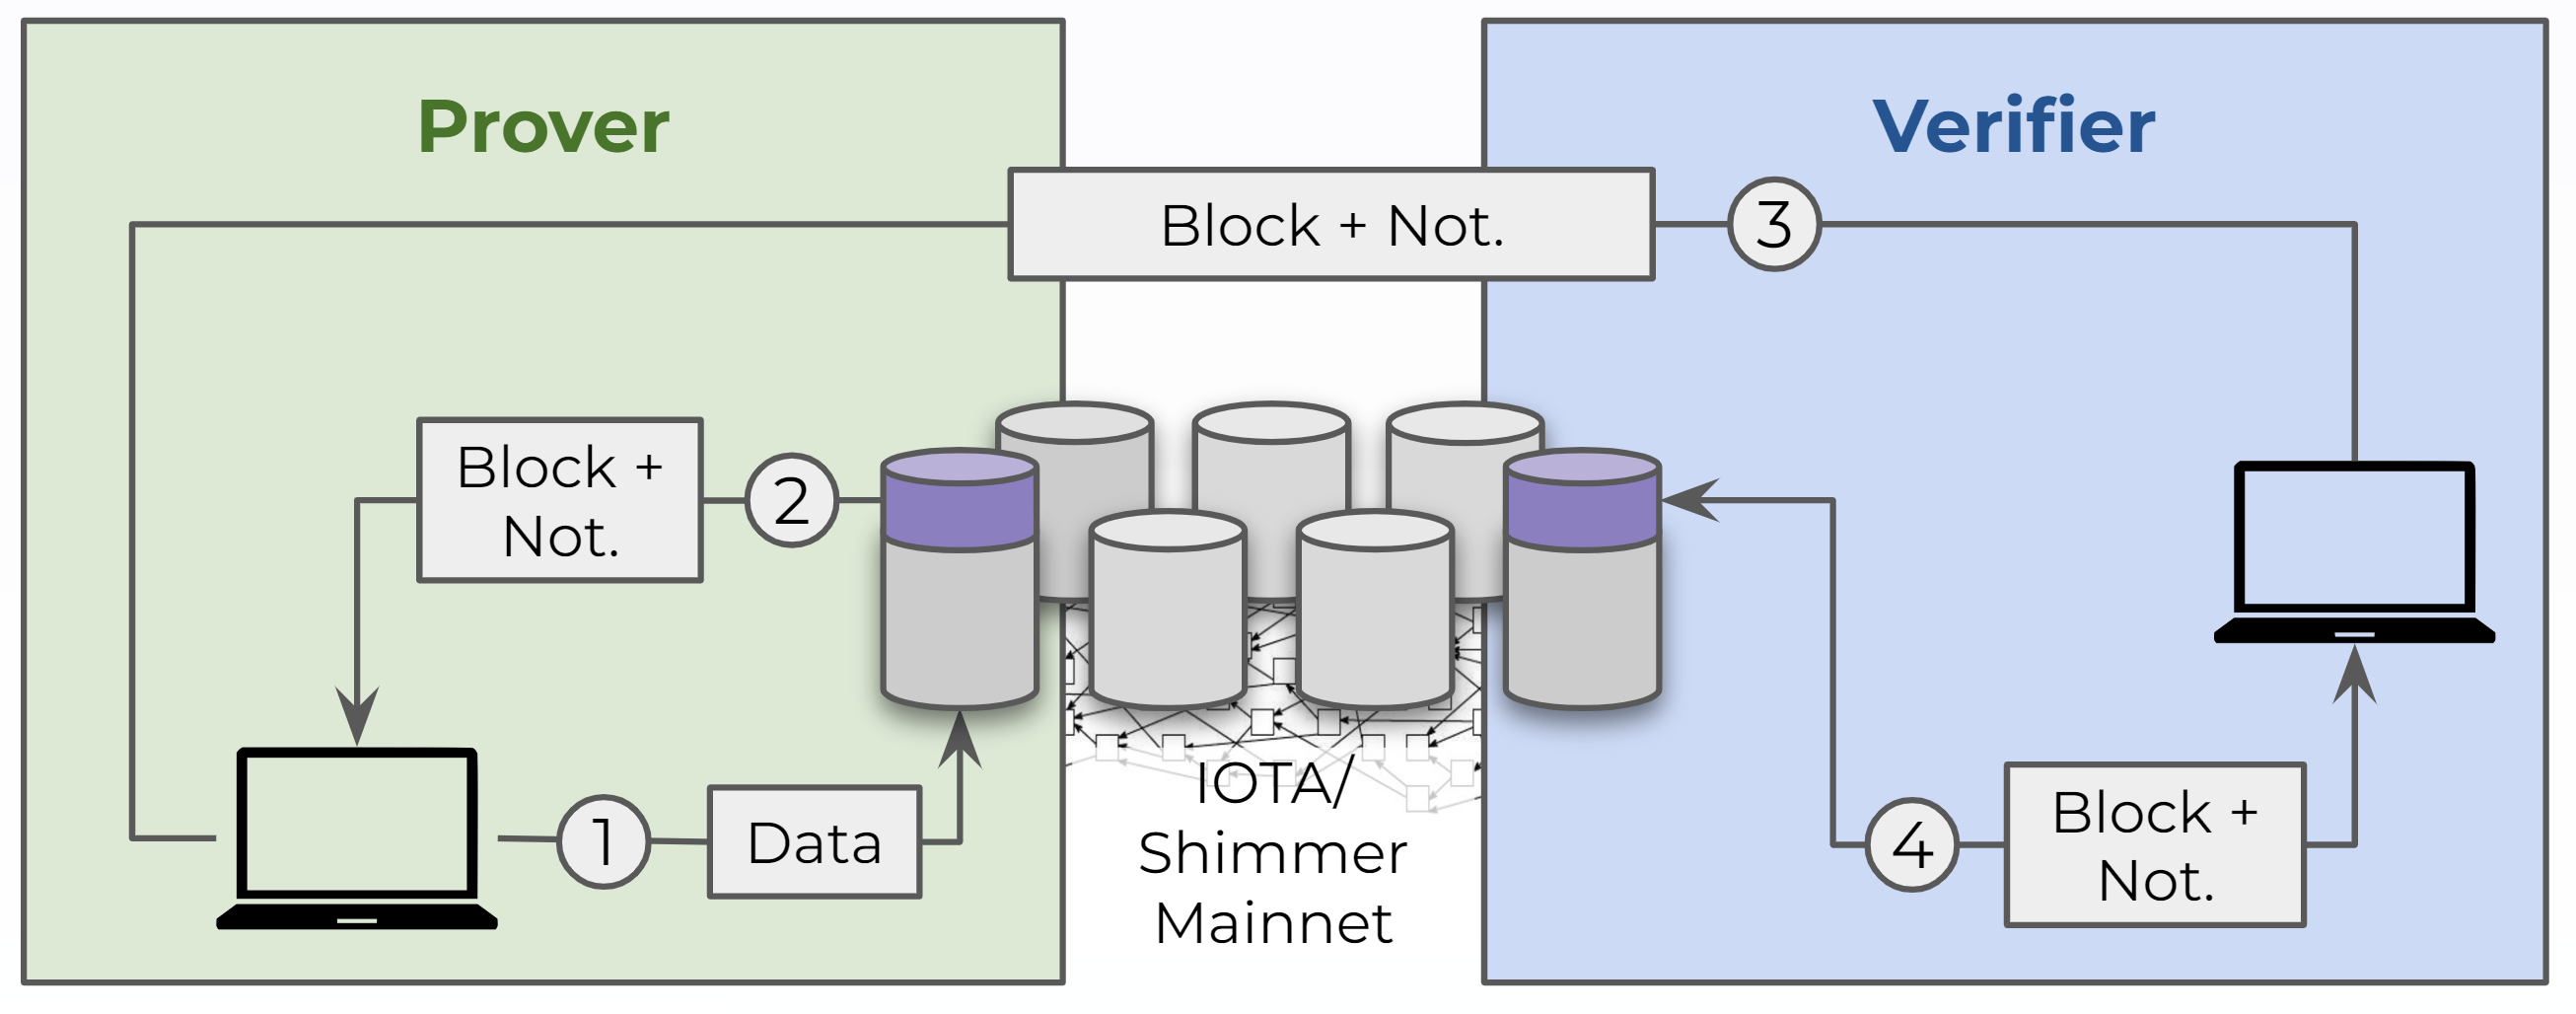
Architecture
In this use case, the party writing to the Tangle (prover) is the same party reading from it. This allows reading a block by its block Id together with proof. The only information a verifier needs to verify this proof, is the chain of milestones back to the exact milestone that referenced the respective block. Every milestone directly references the previous milestone, which leads to a unique and verifiable chain of milestones in the Tangle. Even if the verifier's notarization plugin didn't record the milestone history already, it could still download the milestone chain from another source and verify its correctness before using it to notarize verifications.
Since the pattern assumes trusted access to the network, we recommend that both the prover and the verifier operate their own network node and run the INX Notarization/PoI Plugin. Only if you operate your own node together with the plugin, you can be sure the returned information is trustworthy.
Please note that this pattern does not rely on a Permanode storing the entire Tangle history, as it was the case in almost all data-related use cases in the past. In comparison to a Permanode, storing selected blocks with their proof of inclusion to the Tangle, drastically reduces the node operator's storage requirements.
Prerequisites
Network
- You can use the IOTA Sandbox to run this tutorial locally.
- The node should run the INX-POI. The node(s) will start the INX-POI plugin by default.
Development Environment and Libraries
Set Up
Prepare Your Development Environment
- Create a new folder for the tutorial in a location of your choice, for example:
mkdir notarization-tutorial
cd notarization-tutorial
- You should run the Node.js initializer to configure the project.
npm init --yes
- Add
@iota/iota.jsas a dependency by running the following command:
npm install @iota/iota.js
Create Your Scripts
Network Configuration Script
Both the script that will create and verify the notarization will need to share a network.
Create a new file named networkConfig.js and add the following code:
var networkConfig = {};
// Private Tangle Network
networkConfig.node = 'http://localhost:14265';
networkConfig.faucet = 'http://localhost:8091';
networkConfig.explorer = 'http://localhost:8082/dashboard/explorer/';
module.exports = { networkConfig };
Create Notarization Script
Create a new file named create-notarization.js.
We broke the code into separate snippets to help you understand it better. To make it work, copy all code snippets one after another into the file that you have just created.
1. Imports and parameters
This part imports all necessary packages and network configuration parameters.
const {
  SingleNodeClient,
  LocalPowProvider,
  sendData,
} = require('@iota/iota.js');
const fs = require('fs');
const fetch = require('node-fetch');

// Network configuration
const { networkConfig } = require('./networkConfig.js');
const nodeURL = networkConfig.node;
const explorerURL = networkConfig.explorer;

// For better readability, some console output will be printed in a different color
const consoleColor = '\x1b[36m%s\x1b[0m';
2. Main function
The main() function will be called when running the create-notarization.js file and consists of the following steps:
Declare the function and setup a node client for the interaction with the network.
async function main() {
  // Setup client and define block content
  const client = new SingleNodeClient(nodeURL, {
    powProvider: new LocalPowProvider(),
  });
Define the content (tag & data), attach new block to the Tangle and log out the explorer link.
// Define block content, attach block to the Tangle and log out the explorer link
const tag = 'This is my Tag';
const data = 'This is my data';

const sendResult = await sendData(client, tag, data);
const blockId = sendResult.blockId;

console.log(consoleColor, 'Attached block:');
console.log(explorerURL + 'block/' + blockId, '\n');
Wait for block confirmation by a milestone and read the block with proof of inclusion from INX plugin. The function getNotarization() will be explained in more detail in the next section.
// Wait for block confirmation by milestone and read it with proof of inclusion from INX plugin
const result = await getNotarization(client, nodeURL, blockId);
This part will only be exectured, if the respective block was confirmed by a milestone after a defined time. If that is the case, the returned notarization result will be stored in a *.json file and the file path will be logged out.
  // Store block with proof of inclusion in local json file
  if (result != false) {
    const filePath = `./notarized-block.json`;
    fs.writeFileSync(filePath, JSON.stringify(result, null, 4));

    console.log(
      consoleColor,
      'Block successfully notarized and stored at:'
    );
    console.log(filePath, '\n');

    console.log(
      consoleColor,
      'The Notarized block can now be handed over to the verifier',
    );
  }
}
3. Get notarization
As described in the previous step, the getNotarization() function is called from within main(). As soon as a block was referenced by a milestone, the notarization for the block is fetched from the proof of inclusion plugin and returned by the function. The function tries to fetch the metadata of a given blockId 10 times, waiting for a second before each try. In case the block was still not referenced by a milestone, the function returns false.
// Check for block confirmation and return proof of inclusion, if confirmed after n tries
async function getNotarization(client, nodeURL, blockId) {
  try {
    console.log(
      consoleColor,
      'Wait for milestone confirmation to get notarized block:',
    );

    let i = 0;
    while (i < 10) {
      i++;
      // Function waits for a certain time between iterations
      await sleep(1000);

      const blockMetadata = await client.blockMetadata(blockId);

      // If a block was referenced by a milestone, the metadata contains the field 'referencedByMilestoneIndex'
      if ('referencedByMilestoneIndex' in blockMetadata) {
        console.log(
          `Try ${i}: Block was referenced by milestone #${blockMetadata.referencedByMilestoneIndex}`,
          '\n',
        );

        // Call "create" endpoint of PoI plugin with blockId and return the result
        const poiPluginUrl = `${nodeURL}/api/poi/v1/create/${blockId}`;
        const response = await fetch(poiPluginUrl);
        const result = await response.json();

        return result;
      } else {
        console.log(`Try ${i}: Block was not yet referenced by a milestone`);
      }
    }
    console.log(`Block was not referenced by a milestone after ${i} seconds.`);

    return false;
  } catch (error) {
    console.log(error);
  }
}
4. Delay function
The function sleep() receives a number of milliseconds and acts as a time delay for whichever function is calling it.
function sleep(ms) {
  return new Promise((resolve) => {
    setTimeout(resolve, ms);
  });
}
5. Execute main function
As a final step the function main() is called in order to trigger the process as described above.
main().catch((err) => console.error(err));
Verify Notarization Script
Create a new file named verify-notarization.js.
Just like with the Create Notarization script, we broke the code into separate snippets. To make it work, copy all code snippets one after another into the file that you have just created.
1. Imports and parameters
This part imports all necessary packages and network configuration parameters.
const { TransactionHelper } = require('@iota/iota.js');
const fs = require('fs');
const fetch = require('node-fetch');

// Network configuration
const { networkConfig } = require('./networkConfig.js');
const nodeURL = networkConfig.node;
const explorerURL = networkConfig.explorer;

// For better readability, some console output will be printed in a different color
const consoleColor = '\x1b[36m%s\x1b[0m';
2. Main function
The main() function will be called when running the verify-notarization.js file and consists of the following steps:
Declare the function, read the notarization file and parse it.
async function run() {
    // Read and parse notarized block from file path
    const filePath = './notarized-block.json';
    const file = fs.readFileSync(filePath);
    const notarizedBlock = JSON.parse(file);

    console.log(consoleColor, 'Successfully imported notarized block from path:');
    console.log(filePath, '\n');
Derive the blockId from the block content and log out the explorer link.
// Generate blockId from block content and log explorer link
// The blockId is defined as the BLAKE2b-256 hash of the entire serialized block
const blockId = TransactionHelper.calculateBlockId(notarizedBlock.block);
console.log(consoleColor, 'Notarized block:');
console.log(explorerURL + 'block/' + blockId, '\n');
Fetch validity (true/false) of the notarization from the proof of inclusion plugin. The function verifyNotarization() will be explained in more detail in the next section.
    // Verify provided notarization/proof of inclusion for block
    const validity = await verifyNotarization(nodeURL, notarizedBlock);
    console.log(consoleColor, 'Validity of provided notarization:');
    console.log(validity, '\n');
}
3. Verify notarization
As described in the previous step, the verifyNotarization() function is called from within main(). The function sends the notarized block to the validate endpoint of the proof of inclusion plugin and returns the booolean result.
async function verifyNotarization(nodeURL, notarizedBlock) {
  // Call "validate" endpoint of PoI plugin with notarized block and return boolean answer
  const poiPluginUrl = `${nodeURL}/api/poi/v1/validate`;
  const response = await fetch(poiPluginUrl, {
    method: 'POST',
    body: JSON.stringify(notarizedBlock),
    headers: { 'Content-Type': 'application/json' },
  });
  const result = await response.json();

  return result.valid;
}
4. Execute main function
As a final step the function main() is called in order to trigger the process as described above.
main().catch((err) => console.error(err));
Run Your Scripts
Once you have created your scripts, you can execute the two created files in order.
Naturally, you will need to run create-notarization before you can run verify-notarization and check the log output to follow along.
Create Notarization
You can create the notarization in the Tangle by running the following command:
node create-notarization.js
Your console output should look similar to this:
Attached block:
http://localhost:8082/dashboard/explorer/block/<id_of_your_notarized_block>

Wait for milestone confirmation to get notarized block:
Try 1: Block was not yet referenced by a milestone
Try 2: Block was not yet referenced by a milestone
Try 3: Block was referenced by milestone <number_of_milestone_referencing_your_block>

Block successfully notarized and stored at:
./notarized-block.json
Notarized block can now be handed over to the verifier
Verify Notarization
You can verify the notarization by running the following command:
node verify-notarization.js
Your console output should look similar to this:
Successfully imported notarized block from path:
./notarized-block.json

Notarized block:
http://localhost:8082/dashboard/explorer/block/<id_of_your_notarized_block>

Validity of provided notarization:
true